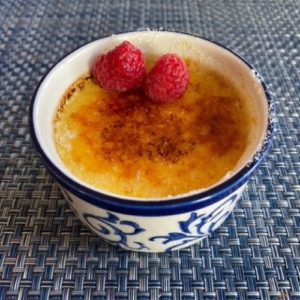
Sous vide creme brulee – the internet seems to think this is the best way to make a crème brûlée. We don’t own a sous vide machine (it’s on our list of useless counter accoutrements, sorry!), so we’ll dedicate this post to the classic crème brûlée we made the traditional way growing up. You’ll end up with perfect results, we promise, even without the sous vide bath.
This recipe, regrettably, also requires the use of a hot water bath. You know our feelings on that topic, and they are not positive. In fact, we singed several fingers in testing this recipe. However, the water bath is an important part of this recipe as it prevents the delicate custard from heating up too fast and curdling.
A Short History of Crème Brûlée
While we think of crème brûlée as a quintessentially French dessert, its origins may in fact lie in England. Similar recipes can be found in English recipe books as early as the 15th century. During spring calving season, bakers used the extra rich cream for baked custards. Some say that a student (or cook) at Trinity College Cambridge invented the idea of adding caramel to the top, inspired by the idea of burning the image of the college’s crest onto the cooked custard. The recipe remains on the school’s menu, where it is of course known as Cambridge Cream or Trinity Cream. A similar recipe is recorded in writing in 17th century cookbooks, although instead of burning the sugar onto the custard, a disk of caramel was placed on top after baking.
However, we have New York’s Le Cirque to thank for the 1980s revival which brought crème brûlée to the forefront of our childhood dessert memories. One could say that crème brûlée’s popularity surged because it was so well aligned with the excess and glitz of the period. Or, one could just argue it’s a darn good dessert. Our mother used to make this recipe in very flat ramekins as a special treat, perhaps inspired by some of the French restaurants she visited. The flat ramekins allowed for a higher proportion of caramel to custard, making it a less dense, but way sweeter confection.
Useful Tools for Making this Crème Brûlée
The best thing about this recipe is that it gives you a chance to wield a blow torch. So, if after you’re done caramelizing your custards, you want to go weld something, you can. Can you think of any other recipe with that quality?
If fire safety is your thing, however, you may prefer a smaller kitchen blow torch, in which case we recommend this one:
This recipe is also a wonderful excuse to buy some cute ramekins. Here are some of our favorites. Note that ramekins come in a range of sizes from 4 oz to 10 oz and you can vary the size of your portions (and thus the number people served) based on the ramekin size. This recipe yields 48 oz of liquid. This will give you 8 6-oz servings, 6 8-oz servings, or 12 4-oz servings. If you’re not sure about the size of your ramekin, simply fill it with water and pour the contents into a glass measuring cup to confirm the volume.
Flavoring ideas:
Some people like to get a bit fancy with their crème brûlée. Here are some flavor options you can add to the hot cream. We usually add about a 1/2 tsp of any flavoring agent:
- lemon extract or zest, and thyme
- dried lavender
- orange blossom water
We also sometimes like to add some raspberries to the bottom of our ramekins for a tangy fruity crème brûlée.
What do I do with 10 Egg Whites?
This recipe calls for a whopping 10 egg yolks. Wondering what to do with all those leftover egg whites? Here are some ideas:


Useful Tools For Making

Crème Brûlée
Equipment
- 8 6-oz ramekins
Ingredients
- 4 cups heavy whipping cream light cream, or half and half
- 1 vanilla bean pod split lengthwise, or 1 tsp vanilla extract or vanilla bean paste
- 1/4 tsp salt
- 10 large egg yolks at room temperature
- 1 cup sugar more for topping
- Fresh berries to serve
Instructions
- Preheat oven to 325 F.
- Combine cream, vanilla pod and salt in a saucepan and cook over low heat until just hot. Let sit for a few minutes, then discard the vanilla bean. (If using vanilla extract, add it now — you don’t want to cook it as it will reduce the flavor).Whisk egg yolks and sugar together in a large bowl until pale yellow.
- Stir about a quarter of the hot cream into the sugar mixture. Then, pour the sugar-egg mixture into the cream and stir until the sugar melts.
- Pour the custard mixture into eight 6-ounce ramekins. Tap the ramekins gently to remove air bubbles, then place ramekins in a baking dish. Place baking dish in the oven and pour room temperature water around until it reaches half way up the ramekins.
- Bake 30-40 minutes until the centers of the surface of the custards are barely set.
- Cool completely then chill in the refrigerator for several hours or up to a couple of days.
- When ready to serve, sprinkle sugar on top of the custards in a thin layer.
- Now, it’s time to whip out your blow torch! Heat the sugar until caramelized.
- If you don’t have a blowtorch or kitchen torch, or have a fear of an open flame (totally reasonable, by the way) simply preheat the broiler and broil ramekins 2-3 inches from the heat source for 5 minutes.
- Top with fresh berries for a finishing touch
Notes
1/2 tsp lemon extract and 1/2 tsp thyme
1/2 tsp dried lavender
1/2 tsp orange blossom water
We also sometimes like to add some raspberries to the bottom of our ramekins for a tangy fruity crème brûlée.
Affiliate Disclosure: As Amazon Associates, we earn a small commission from qualifying purchases when you click on links embedded in this post.

